What are the 7 Steps to Mind Mapping? (A Beginner’s Guide)
What are the 7 Steps to Mind Mapping? (A Beginner’s Guide)
I remember the exact moment mind mapping “clicked” for me. I was trying to plan a new website, and my desk looked like a detective’s conspiracy board—covered in dozens of sticky notes. I had all the ideas, but I had no idea how they connected. I was completely overwhelmed.
That’s the trap of traditional, linear note-taking. We write things down in lists, but our brains don’t think in lists. They think in connections, pictures, and explosions of related ideas.
If you’re drowning in information or trying to pin down a creative idea, you’re in the right place. The question “What are the 7 steps to mind mapping?” is the perfect starting point. A mind map is a visual diagram that mirrors this natural way of thinking, and it’s a total game-changer for organizing thoughts, studying, and brainstorming.
Let’s walk through the simple, seven-step process to get you creating your first map in the next 10 minutes.

First, What is a Mind Map, Really?
Before we get to the how, let’s nail down the what.
A mind map is a visual tool that starts with a single, central concept and “radiates” outwards with related ideas, words, and images. Instead of top-to-bottom notes, it’s a 360-degree diagram that shows the hierarchy and relationships between different pieces of information.
Think of it like a map of a city. You have the city center (your main idea), which is connected to major highways (your main topics). Those highways lead to smaller roads (your details), which in turn lead to individual houses (your specific keywords).
The Core Idea: Radiant Thinking Explained
The term “mind map” was popularized by author and psychologist Tony Buzan. He based the entire technique on what he called “radiant thinking.”
This is the simple, powerful idea that our brains work by association. When you think of the word “apple,” you don’t just think “A-P-P-L-E.” Your brain instantly fires off a dozen related concepts: red, fruit, tree, iPhone, crunchy, healthy, pie.
A mind map is just a physical representation of that radiant thinking process. It gets all those connections out of your head and onto a page where you can finally see them clearly.
Why Mind Maps Work (According to Science)
This isn’t just a neat visual trick; it works because it engages your brain on multiple levels.
Traditional notes are boring. They’re typically one color (blue or black ink) and purely text-based. This activates only a small part of your brain, primarily responsible for language.
A mind map, on the other hand, uses:
- Color: Engages the creative, visual part of your brain.
- Images & Symbols: Processed significantly faster by your brain than text.
- Spatial Layout: Uses your spatial memory to help you see where information lives.
- Keywords: Forces your brain to synthesize and summarize, which is a deeper form of learning.
Studies, like those highlighted by the University of North Carolina’s Learning Center, show that visual learning tools like mind maps can significantly improve comprehension and memory retention. You’re not just reading words; you’re creating a memorable visual experience.
Digital vs. Pen & Paper: Which is Better for Beginners?
This is the first question everyone asks. My honest opinion? Start with pen and paper.
- Digital Tools (like Coggle, Miro, or MindMeister) are fantastic for collaboration, project planning, and creating “permanent” maps you can edit later. They are searchable and infinite.
- Pen & Paper is raw, fast, and tactical. The physical act of drawing the lines, uncapping different colored pens, and sketching a quick symbol forms a much stronger neural connection. It feels more “real” and less restrictive.
The biggest mistake I see beginners make is getting stuck on which software to use. Don’t. Grab a blank sheet of paper, turn it sideways (landscape orientation), and get a few colored pens. That’s all you need.
The 7 Steps to Mind Mapping: A Full Tutorial
Alright, let’s build one. Here is the simple, step-by-step process.
Step 1: Start with Your Central Idea (The Core)
This is your starting point. It’s the title of your book, the subject of your exam, or the problem you’re trying to solve.
- How to do it: Draw a small image or write your central idea right in the middle of a blank page.
- Why: Starting in the center gives you 360 degrees of freedom to expand in any direction, mirroring the radiant thinking we talked about.
- Example: If you’re brainstorming a vacation, your central idea might be a drawing of a palm tree on an island, labeled “Summer Vacation.”
Step 2: Add Your First Main Branches (The “Big Ideas”)
These are the main “chapters” of your topic. They are the first, most obvious ideas that spring from your central concept.
- How to do it: Draw 3-5 thick, curved lines radiating out from your central image.
- Why: Curved, organic lines are more visually interesting and engaging for your brain than straight, boring ones. Think of them as the main branches of a tree.
- Example: From “Summer Vacation,” your main branches might be: “Where?”, “Budget,” “When?”, and “Activities.”
Step 3: Branch Out with Sub-Topics (The Details)
Now you start adding the details. Each main branch will have its own smaller “child” branches. This is where you start to build out the hierarchy of your ideas.
- How to do it: Add thinner lines that extend from the end of your main branches. Then add even thinner lines extending from those.
- Why: This creates a clear visual hierarchy. You can instantly see which ideas are “big” and which are “details.”
- Example: From the “Where?” branch, you might add sub-branches for “Beach,” “Mountains,” and “City.” From the “Beach” sub-branch, you could add even smaller branches for “Florida” and “Mexico.”
Step 4: Use Single Keywords (Not Sentences)
This is the most important rule, and the one most beginners break. Do not write full sentences on your branches.
- How to do it: Write a single keyword or very short phrase (2 words max) on the line itself.
- Why: This is the secret sauce. A single word forces your brain to make an active connection when you review it, rather than passively re-reading a full sentence. That active recall is what builds strong memories. It also keeps the map clean and easy to read.
- Bad Example: “I need to figure out how much I can spend.”
- Good Example: “Budget”
Step 5: Add Color to Organize Themes
Your mind map shouldn’t be monochrome. Color is a powerful organizational tool.
- How to do it: Assign a unique color to each main branch and all of its sub-branches.
- Why: This is called “chunking.” It allows your brain to group an entire section of your map into one visual theme. You’ll instantly associate “green” with your “Budget” branch and “blue” with your “Activities” branch.
- Example: The “Where?” branch and all its children (“Beach,” “Florida,” etc.) are all blue. The “Budget” branch and its children (“Flights,” “Hotels”) are all green.
Step 6: Use Images and Symbols (Speak Visually)
A picture is worth a thousand words. This is especially true in mind mapping.
- How to do it: Wherever possible, use simple sketches, icons, or symbols instead of (or in addition to) a word.
- Why: Your brain is wired to process and remember images instantly. A small drawing of an airplane next to “Flights” is far more memorable than the word alone. Don’t worry about being an artist—a simple stick figure or a box is perfect.
- Example: Next to “Budget,” draw a $ sign. Next to “When?”, draw a small calendar.
Step 7: Review and Make Connections (The “Aha!” Moment)
Once you’ve “dumped” all your ideas onto the map, take a step back. Look at the whole picture. This is where the magic happens.
- How to do it: Look for connections between different branches. Draw new, dotted or arrowed lines to link related ideas from different main branches.
- Why: This is where true problem-solving and creativity ignite. You might suddenly see that a “Budget” item (e.g., “cheap flights”) is directly related to a “When?” item (e.g., “September”). You’re no longer just listing ideas; you’re understanding the system.
- Example: Draw a dotted arrow from “Swimming” on your “Activities” branch to “Beach” on your “Where?” branch.
Mind Mapping Techniques: Pro-Tips for Beginners
Those 7 steps are the core, but let’s talk about the practice of it.
The Biggest Mistake I See People Make
I mentioned it in Step 4, but it’s worth repeating. The single biggest mistake is writing full sentences. It turns your beautiful, radiant map into a cluttered, glorified list. It kills the speed and the “at-a-glance” readability.
Trust your brain. A single keyword is all you need to trigger the memory. Keywords, not sentences.
How to Choose the Right Mind Mapping Software
If you’ve tried paper and are ready to go digital, here’s my advice: start free. I’ve tested dozens of tools, and frankly, most free options are all you’ll ever need. Look for one that is fast, simple, and doesn’t get in your way. You can always check review sites like PCMag or Capterra, but don’t overthink it. The tool is far less important than the technique.
A Pro-Tip I Learned the Hard Way
Here’s a tip that took me years to learn: Your first map is a draft, not a masterpiece.
Your first mind map is often just a chaotic “brain dump” to get everything out of your head. It’s supposed to be messy. The real clarity often comes from reorganizing that information into a second, cleaner map. Don’t be afraid to throw your first one away. The value was in the act of making it.
Putting It Into Practice: Real Mind Map Examples
So, what does this look like for real-world tasks?
Example 1: Mind Mapping for Studying
This is a classic. Instead of re-reading a textbook, create a mind map.
- Central Idea: “The French Revolution”
- Main Branches: “Causes,” “Key Figures,” “Major Events,” “Outcomes”
- Sub-Branches: Under “Causes,” you’d have “Economic,” “Social,” and “Political.” Under “Economic,” you’d have “Debt” and “Taxes.”
- Why it works: You can see the entire chapter on one page. It transforms a 30-page chapter into a single, high-level visual, making it dramatically easier to revise for an exam and improve memory.
Example 2: Mind Mapping for Project Planning
This is what I use it for most.
- Central Idea: “New Website Launch”
- Main Branches: “Design,” “Content,” “Tech,” “Marketing”
- Sub-Branches: Under “Content,” you’d have “Blog,” “About Page,” and “Services Page.” Under “Marketing,” you’d have “SEO,” “Social Media,” and “Email List.”
- Why it works: It ensures you don’t miss anything. By making connections (e.g., linking “Blog” from “Content” to “SEO” from “Marketing”), you start to see your project as an interconnected system.
Example 3: Mind Mapping for Problem-Solving
Feeling stuck? Mind mapping is one of the best brainstorming techniques.
- Central Idea: “Why is my business stuck?”
- Main Branches: “Product,” “Price,” “Marketing,” “Team”
- Sub-Branches: Just start asking “why?” and “what if?” on each branch. Under “Marketing,” you might add “Not Enough Traffic,” which branches to “SEO?” and “Ads?” This helps you organize thoughts and identify the root of the problem, not just the symptoms.
What’s the Big Takeaway?
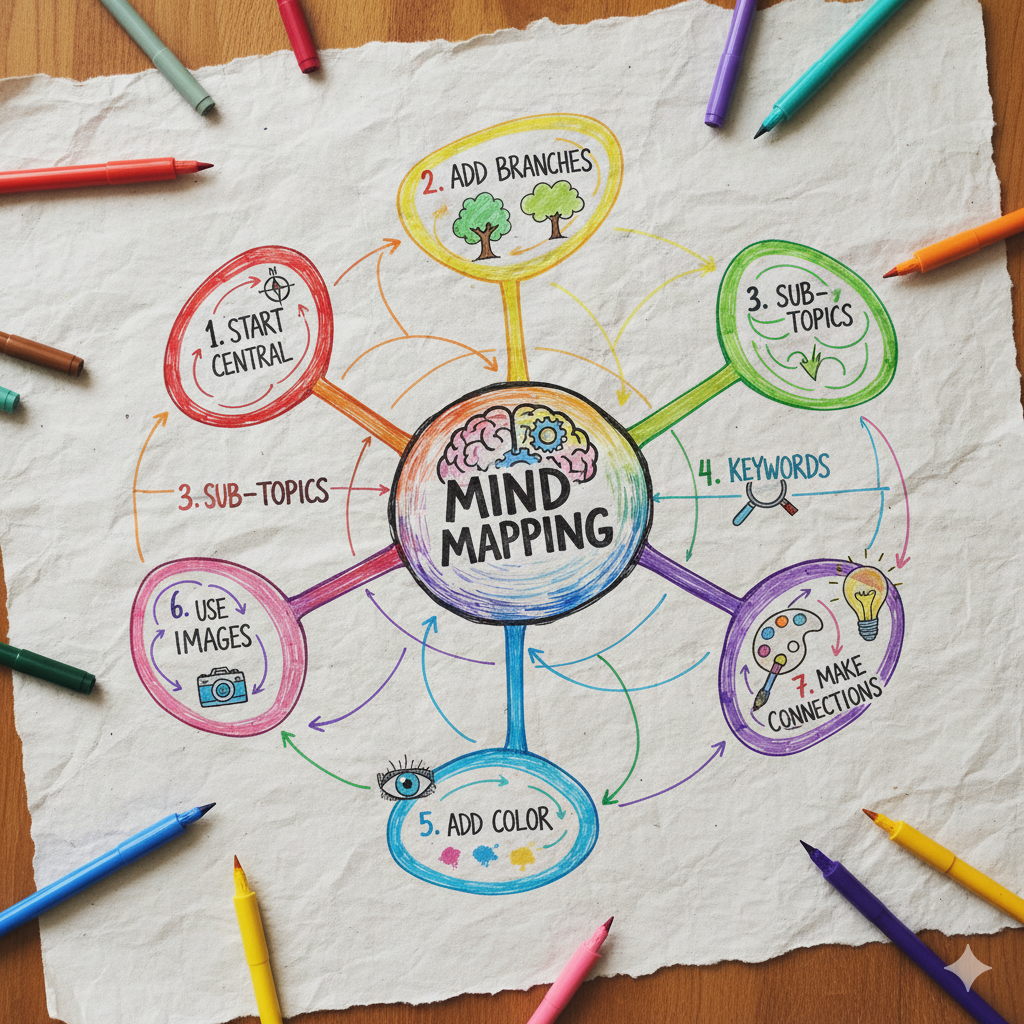
Those 7 steps—Start Central, Add Branches, Add Sub-Topics, Use Keywords, Add Color, Use Images, and Make Connections—are your framework.
But the real magic isn’t in the steps themselves. It’s in the process. It’s about giving your brain permission to think the way it naturally wants to: in connections, colors, and pictures. It’s a way to get out of your own way and see the full landscape of your ideas.
Your first map might be messy. That’s fine. Mine still are. The goal isn’t to create a work of art. The goal is clarity.
Now it’s your turn. Grab a piece of paper and try mapping out your day, a project you’re working on, or even just what you want to make for dinner.
I’d love to hear how it goes. Leave a comment below and let me know: what will you create your first mind map about?